How To Create A Struts 2 Web Application
- Java Requirements
- Our First Application
- Create Struts 2 Web Application Using Maven To Manage Artifacts and To Build The Application
- Getting Help
This tutorial walks through installing the framework and creating a simple application.
While the Struts 2 framework is simple to use, creating non-trivial applications assumes a working knowledge of many J2EE technologies, including:
- Java
- Filters, JSP, and Tag Libraries
- JavaBeans
- HTML and HTTP
- Web Containers (such as Tomcat)
- XML
For more about supporting technologies, see the Key Technologies Primer.
Java Requirements
Struts 2 requires Servlet API 2.4 or higher, JSP 2.0 or higher, and Java 7 or higher.
Our First Application
To get started using Struts 2 we will create a web application using Maven to manage the artifact dependencies. You can checkout all the example applications from the Struts 2 GitHub repository at struts-examples.
Create Struts 2 Web Application Using Maven To Manage Artifacts and To Build The Application
This tutorial assumes you know how to create a Java web application that uses Maven to manage artifacts and build the web application archive (war) file.
Step 1 - Create A Java Web Application
In your Java IDE create a Java web application with a project name of basic_struts that follows the standard Maven
project folder structure. In your pom.xml include the following:
pom.xml build node
<build>
    <finalName>basic-struts</finalName>
</build>
to run the application using maven, add the jetty maven-plugin to your pom.xml
pom.xml jetty plugin
<build>
    ...
    <plugins>
        <plugin>
            <groupId>org.eclipse.jetty</groupId>
            <artifactId>jetty-maven-plugin</artifactId>
            <version>9.4.7.v20170914</version>
            <configuration>
                <webApp>
                    <contextPath>/${build.finalName}</contextPath>
                </webApp>
                <stopKey>CTRL+C</stopKey>
                <stopPort>8999</stopPort>
                <scanIntervalSeconds>10</scanIntervalSeconds>
                <scanTargets>
                    <scanTarget>src/main/webapp/WEB-INF/web.xml</scanTarget>
                </scanTargets>
            </configuration>
        </plugin>
    </plugins>
</build>
The above plugin will enable you to run the application using mvn jetty:run
Step 2 - Add index.jsp
Our next step is to add a simple index.jsp to this web application. Create an index.jsp under src/main/webapp
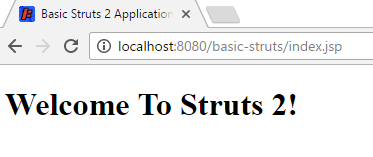
with a title of Basic Struts 2 Application - Welcome and in the body add an h1 heading of Welcome To Struts 2!
index.jsp
<!DOCTYPE html>
<%@ page language="java" contentType="text/html; charset=UTF-8" pageEncoding="UTF-8" %>
<html>
  <head>
    <meta charset="UTF-8">
    <title>Basic Struts 2 Application - Welcome</title>
  </head>
  <body>
    <h1>Welcome To Struts 2!</h1>
  </body>
</html>
Run mvn jetty:run to run the application.
In a web browser go to http://localhost:8080/basic-struts/index.jsp. You should see the following:

Step 3 - Add Struts 2 Jar Files To Class Path
Now that we know we have a working Java web application, let’s add the minimal required Struts 2 framework Jar files
to our web application’s class path. In pom.xml add the following dependency node:
pom.xml dependency node
<dependency>
    <groupId>org.apache.struts</groupId>
    <artifactId>struts2-core</artifactId>
    <version>${struts2.version}</version>
</dependency>
Of course replace the ${struts2.version} with the current Struts 2 version (or define within pom properties).
Maven will get the struts2-core jar and the other jar
files struts2-core requires (transitive dependencies).
Beginning with Struts version 2.2.3 you do not need to specify a separate dependency node for javassist.
Step 4 - Add Logging
To see what’s happening under the hood, the example application for this tutorial uses log4j2.
Setup a log4j2.xml configuration in the src/main/resources folder which contains the following
log4j2.xml
<?xml version="1.0" encoding="UTF-8"?>
<Configuration>
    <Appenders>
        <Console name="STDOUT" target="SYSTEM_OUT">
            <PatternLayout pattern="%d %-5p [%t] %C{2} (%F:%L) - %m%n"/>
        </Console>
    </Appenders>
    <Loggers>
        <Logger name="com.opensymphony.xwork2" level="debug"/>
        <Logger name="org.apache.struts2" level="debug"/>
        <Root level="warn">
            <AppenderRef ref="STDOUT"/>
        </Root>
    </Loggers>
</Configuration>
Note the above log4j2 configuration specifies the console as the log target.
You’ll need to add a dependency node for log4j2 to the pom:
pom.xml log4j dependency node
<dependency>
    <groupId>org.apache.logging.log4j</groupId>
    <artifactId>log4j-core</artifactId>
    <version>${log4j2.version}</version>
</dependency>
<dependency>
    <groupId>org.apache.logging.log4j</groupId>
    <artifactId>log4j-api</artifactId>
    <version>${log4j2.version}</version>
</dependency>
Using both log4j-core and log4j-api allows to use the latest version of Log4j2 without a clash with version provided by the framework.
Optionally, if using maven bom “bill of materials” in dependencyManagement section for both Struts and log4j2,
pom.xml will look like. Note that this way you can omit version line for every used module,
and all struts2-* and log4j-* modules are managed to be of the same version.
The struts2-bom is available since 2.3.20.
<properties>
	<project.build.sourceEncoding>UTF-8</project.build.sourceEncoding>
	<project.reporting.outputEncoding>UTF-8</project.reporting.outputEncoding>
	<java.version>1.8</java.version>

	<struts2.version>2.5.14.1</struts2.version>
	<log4j2.version>2.10.0</log4j2.version>
</properties>

<dependencyManagement>
	<dependencies>
		<dependency>
			<groupId>org.apache.struts</groupId>
			<artifactId>struts2-bom</artifactId>
			<version>${struts2.version}</version>
			<type>pom</type>
			<scope>import</scope>
		</dependency>
		<dependency>
			<groupId>org.apache.logging.log4j</groupId>
			<artifactId>log4j-bom</artifactId>
			<version>${log4j2.version}</version>
			<scope>import</scope>
			<type>pom</type>
		</dependency>
	</dependencies>
</dependencyManagement>

<dependencies>
	<!-- Struts 2 -->
	<dependency>
		<groupId>org.apache.struts</groupId>
		<artifactId>struts2-core</artifactId>
	</dependency>

	<dependency>
		<groupId>org.apache.logging.log4j</groupId>
		<artifactId>log4j-core</artifactId>
	</dependency>
</dependencies>
Step 5 - Add Struts 2 Servlet Filter
To enable the Struts 2 framework to work with your web application you need to add a Servlet filter class and filter
mapping to web.xml. Below is how the web.xml may look after adding the filter and filter-mapping nodes. web.xml is to be under src/main/webapp/WEB-INF folder.
web.xml Servlet Filter
<?xml version="1.0" encoding="UTF-8"?>
<web-app id="WebApp_ID" version="2.4"
	xmlns="http://java.sun.com/xml/ns/j2ee"
	xmlns:xsi="http://www.w3.org/2001/XMLSchema-instance"
	xsi:schemaLocation="http://java.sun.com/xml/ns/j2ee http://java.sun.com/xml/ns/j2ee/web-app_2_4.xsd">
	<display-name>Basic Struts2</display-name>
	<filter>
		<filter-name>struts2</filter-name>
		<filter-class>org.apache.struts2.dispatcher.filter.StrutsPrepareAndExecuteFilter</filter-class>
	</filter>

	<filter-mapping>
		<filter-name>struts2</filter-name>
		<url-pattern>/*</url-pattern>
	</filter-mapping>

	<welcome-file-list>
		<welcome-file>index</welcome-file>
	</welcome-file-list>
</web-app>
For more information about configuring the deployment descriptor for Struts 2 see Core Developers Guide / web.xml page. Note the url-pattern node
value is /* meaning the Struts 2 filter will be applied to all URLs for this web application.
Step 6 - Create struts.xml
Struts 2 can use either an XML configuration file or annotations (or both) to specify the relationship between a URL,
a Java class, and a view page (such as index.jsp). For our basic Struts 2 application, we’ll use a minimal xml
configuration. Note the file name is struts.xml and it should be in the src/main/resources folder (struts.xml
must be on the web application’s root class path).
struts.xml
<?xml version="1.0" encoding="UTF-8"?>
<!DOCTYPE struts PUBLIC
    "-//Apache Software Foundation//DTD Struts Configuration 2.5//EN"
    "http://struts.apache.org/dtds/struts-2.5.dtd">

<struts>

    <constant name="struts.devMode" value="true" />

    <package name="basicstruts2" extends="struts-default">
        <action name="index">
            <result>/index.jsp</result>
        </action>
    </package>

</struts>
This minimal Struts 2 configuration file tells the framework that if the URL ends in index.action to redirect
the browser to index.jsp.
For more information about the struts.xml configuration file see struts.xml.
Step 7 - Build and Run the Application
Run mvn jetty:run to run the web-application using the jetty maven-plugin.
View the console where you should see numerous debug messages that tell you the Struts 2 framework is being included in the basic-struts2 web application.
Open a web browser and go to http://localhost:8080/basic-struts/index.action
(note that’s index.action not index.jsp at the end of the URL). You should see the same web page as when going to
http://localhost:8080/basic-struts/index.jsp. View the log
messages written to the console and you should find several that discuss index.action and index.jsp:
Struts 2 Log Messages
...
2017-04-17 11:16:01,084 DEBUG [qtp1723848804-22] xwork2.DefaultActionProxy (DefaultActionProxy.java:89) - Creating an DefaultActionProxy for namespace [/] and action name [index]
...
2017-04-17 11:16:01,172 DEBUG [qtp1723848804-22] result.ServletDispatcherResult (ServletDispatcherResult.java:131) - Forwarding to location: /index.jsp
...
Getting Help
The Struts 2 user mailing list is an excellent place to get help. If you are having a problem getting this Basic Struts 2 application to work search the Struts 2 mailing list. If you don’t find an answer to your problem, post a question on the mailing list.
| Return to Getting started | or | onward to Hello World using Struts 2 |
