
Themes
- Introduction
- Specifying The Theme Struts Should Use
- Specifying The CSS Used By The Struts Tag
- Creating And Applying Your Own Themes For Struts Tags
- Summary
The example code for this tutorial, themes, is available for checkout at struts-examples
Introduction
When you use a Struts tag such as s:select in your web page, the Struts framework generates HTML that styles
the appearance and controls the layout of the select control. The style and layout is determined by which Struts theme
is set for the tag. Struts comes with four built-in themes: simple, xhtml, css_xhtml, and html5. If you don’t specify
a theme, then Struts will use the xhtml theme by default.
The Struts user mailing list is an excellent place to get help. If you are having a problem getting the tutorial example applications to work search the Struts mailing list. If you don’t find an answer to your problem, post a question on the mailing list.
For example, this Struts select tag:
Struts Select Tag
<s:select key="personBean.sport" list="sports" />
generates this HTML markup:
HTML Created By Struts Select Tag
<tr>
    <td class="tdLabel">
        <label for="save_personBean_sport" class="label">Favorite sport:</label>
    </td>
    <td>
        <select name="personBean.sport" id="save_personBean_sport">
            <option value="football">football</option>
            <option value="baseball">baseball</option>
            <option value="basketball" selected="selected">basketball</option>
        </select>
    </td>
</tr>
Notice how the HTML generated uses table tags to control the layout of the label and select HTML. There is also a class,
tdLabel, applied to the table column where the label tag is rendered. Since no theme was specified for the Struts
select tag the default xhtml theme was used.
Specifying The Theme Struts Should Use
The Struts tags have a theme attribute you can use to specify which Struts theme should be used when creating the HTML
for that tag. The values for the theme attribute are simple, xhtml, css_xhtml, html5, and ajax. To learn more
about these themes visit Themes and Templates Documentation. This tutorial will review the xhtml, css_xhtml,
and the simple themes. The html5 theme extends the simple theme with modern HTML5 output (see HTML5 Theme in the documentation.
The ajax theme is a special theme used for ajax operations (see Ajax Theme in the documentation).
You can specify the theme on a per Struts tag basis or you can use one of the following methods to specify what theme Struts should use:
- The
themeattribute on the specific tag - The
themeattribute on a tag’s surrounding form tag - The page-scoped attribute named
theme - The request-scoped attribute named
theme - The session-scoped attribute named
theme - The application-scoped attribute named
theme - The
struts.ui.themeconstant instruts.xml(defaults toxhtml)
Consult Selecting Themes for how to set the theme using the above approaches.
In the example application, examine edit.jsp. The theme attribute of the form tag is set to xhtml. Run the application
(see the readme.txt file) and view the source for edit.jsp after it is rendered in your browser. You should see the form
HTML tags layout controlled by table tags.
Change the theme to simple for the form’s theme attribute and redeploy the application. Examine the source for edit.jsp
after it is rendered in the browser. You should see that there are no table tags controlling the layout and also there
are no label tags for the text fields.
Change the theme to css_xhtml for the form’s theme attribute and redeploy the application. Examine the source for edit.jsp
after it is rendered in the browser. The layout of the form tags is now controlled by div tags and the label tags are back.
Specifying The CSS Used By The Struts Tag
Change the theme attribute for the form tag back to xhtml. Notice when you view the source of edit.jsp after it is rendered
in the browser that there is a class named tdLabel applied to the table column that contains the label. This CSS class
controls the position of the label in the table column. The tdLabel style is defined in /themes/struts/xhtml/styles.css.
The link to this style sheet was included in edit.jsp’s head section when you add the s:head tag to edit.jsp.
Load this style sheet in your browser (in the example application the link is http://localhost:8080/themes/struts/xhtml/styles.css if your Servlet container is running on localhost, port 8080). You’ll see the following:
styles.css
.label {font-style:italic; }
.errorLabel {font-style:italic; color:red; }
.errorMessage {font-weight:bold; color:red; }
.checkboxLabel {}
.checkboxErrorLabel {color:red; }
.required {color:red;}
.tdLabel {text-align:right; vertical-align:top; }
So the .label selector renders the label tag’s text in italic. The .tdLabel tag specifies that the text should align to the right and top of the table column.
You can override the above selectors by including the same selectors in your page’s head section. For example add
the following to the head section of edit.jsp.
Override Label Style
<style type="text/css">
    .label {color:blue; font-style:normal; font-weight:bold}
</style>
Now the label tag will render the text in blue, bold, normal (not italics) style.
Creating And Applying Your Own Themes For Struts Tags
The theme templates (simple, xhtml, css_xhtml) can be found in the Struts core jar file. If you expand (extract the files)
the Struts core jar file you’ll find folders named template.css_xhtml, template.simple, and template.xhtml.
Those folders contain the templates for the three default Struts themes. In each folder is a file for each Struts tag.
For example if you expand the template.xhtml folder you’ll see the select.ftl file.
The Struts framework uses the FreeMarker template engine to generate the HTML for the Struts tags. That’s why the file
extension is .ftl. You can learn more about FreeMarker by visiting https://freemarker.apache.org/.
Also in the template.xhmtl folder is the styles.css file. This is the styles.css file that your application will use
if it uses the xhtml theme.
Let’s say we wanted to create our own theme that will change how the Struts checkboxlist tag displays the checkboxes and their labels.
In the example application I’ve extended the default XHMTL theme (see file theme.properties under src/main/resources/template/KUTheme).
The checkboxlist.ftl theme that is part of the XHTML theme only includes a space between each label and the next checkbox
(see checkboxlist.ftl in the template/simple folder in Struts core). That is why all the checkboxes are displayed
across the width of the browser window. For my custom checkboxlist theme I want to have a break tag after each label tag
so that each checkbox and its label will be on their own line.
In the example application there is a folder named src/main/resources/template/KUTheme. In that folder is a checkboxlist.ftl,
the contents of which I originally copied from the checkboxlist.ftl that is in the templates.xhtml folder from
the Struts core jar.
I then modified the checkboxlist.ftl in the KUTheme folder to be:
Modified checkboxlist.ftl
<#include "/${attributes.templateDir}/${attributes.expandTheme}/controlheader.ftl" />

<#include "/${attributes.templateDir}/KUTheme_simple/checkboxlist.ftl" />

<#include "/${attributes.templateDir}/${attributes.expandTheme}/controlfooter.ftl" /><#nt/>
Be sure to note the change to the second line—using KUTheme_simple in the path.
Then in the example application I created a KUTheme_simple folder under src/main/resources/template (optionally you
can place it under webapp, e.g. src/main/webapp/template ). In that folder I created checkboxlist.ftl and copied
the contents from template.simple checkboxlist.ftl (again found in the Struts core jar). After copying the contents
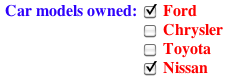
to checkboxlist.ftl that is in KUTheme_simple folder, I modified checkboxlist.ftl so that the label tag has a style
of red bold text and I added a break tag after each label so that each check box and label will be on its own line.
Since the XHTML theme is the default theme and I have a theme.properties file defined with parent = xhtml,
the KUTheme will inherit all the themes from xhmtl except for the theme for the checkboxlist tag since my KUTheme includes
a definition for that tag’s layout. In the struts.xml file (src/main/resources) you will see that the I’ve specified
the default theme to be KUTheme.
In the deployed web application, Struts will first look for a tag’s template on the application’s class path and if it
doesn’t find the template there it will use the default template that is part of the Struts core jar. Since we’ve
added a template folder to the application’s web root, now when Struts creates the HTML to display the checkboxlist
tag it will use the template that is in the KUTheme folder (which tells it to use the checkboxlist.ftl file that is
in the KUTheme_simple folder instead of the one in the template.simple folder that is part of the Struts core Jar).
After redeploying the application the check boxes for the Car Models Owned should appear like:
Summary
You can easily override the default theme used by Struts to control the appearance and layout of a Struts tag. Each
Struts tag has an associated template file (e.g. select.ftl) that is in a folder named after the theme (e.g. xhtml).
By default the Struts framework will look in the Struts core Jar file for the theme folder and templates. However,
if you include your own theme folder (e.g. KUTheme) under webapp/template (or WebContent/template in the Ant version)
and specify that folder name (e.g. KUTheme) as the value for the theme attribute, then the Struts framework will look
in that theme folder for the tag’s template.
To learn more about how to use the Struts themes and how you can override them, visit Themes and Templates Documentation .
| Return to Wildcard method selection | or | onward to Spring and Struts |