
Form Tags
- Introduction
- Example Application
- Struts Select Tag
- Struts Radio Tag
- Struts Select Tag - Object Backed
- Struts Checkbox Tag
- Struts checkboxlist Tag
- Summary
The example code for this tutorial, form-tags, can be checked out from struts-examples.
Introduction
In this tutorial we’ll explore some of the other Struts form controls. In our previous tutorials that explained how to use Struts forms (Processing forms, Form validation, and Message resource files ) we covered how to use the Struts head, form, textfield controls and the key attribute. This tutorial will explore using the Struts select, radio, checkbox, and checkboxlist form controls.
The Struts user mailing list is an excellent place to get help. If you are having a problem getting the tutorial example applications to work search the Struts mailing list. If you don’t find an answer to your problem, post a question on the mailing list.
Example Application
The example application that supports this tutorial shows how to use Struts form tags so that a user can edit his information. The information that can be edited is encapsulated in an object of class Person. A Person object knows these things: first name, last name, favorite sport, gender, state of residency, is or is not over 21, and car models owned.
To enable the user to edit his information that is stored in the Person object, we need to create a form like this one:
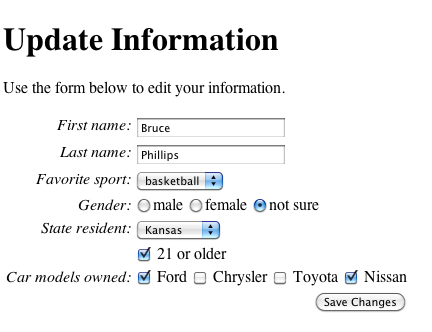
The form allows the user to make changes. After submitting the form, the Struts framework will update the state of the Person object.
The first and last names are shown on the form (see edit.jsp) using the Struts textfield tag, which we’ve discussed in previous tutorials.
Struts Select Tag
A user can select one favorite sport from several choices. The example application uses the Struts select tag to provide the list of options for the select box.
Struts Select Tag
<s:select key="personBean.sport" list="sports" />
In these form tags, we are using the key attribute as discussed in the Message resource files tutorial. The key attribute is used by the Struts framework to determine values for the other attributes (e.g. label and value). We are also using a property file associated with the EditAction class to provide the label values based on the key attribute value (see the Message Resource Files tutorial for information on using Struts property files).
Note that there are many attributes for the Struts form tags, most of which mirror the HTML attributes associated with the tags. You can read about all the attributes for a Struts form tag by consulting the Struts documentation.
The value of the list attribute of the Struts select tag is used by the framework to determine what method of the action class to call in order to create the option values. In our example application, the list attribute value of “sports” results in the framework calling the getSports method of class EditAction. That method returns a String array containing “football”, “baseball”, and “basketball”. Those values are used to create the option tags inside the select tag.
The Struts framework determines which option is preselected by using the key attribute’s value to call a method on the personBean object. Since the key attribute’s value is “personBean.sport”, the framework calls the personBean object’s getSport method. If the value returned by that method matches one of the option values, that option will be marked as “selected”.
Here is the HTML that results from using the above Struts select tag.
HTML Created By Struts Select Tag
<tr>
    <td class="tdLabel">
        <label for="save_personBean_sport" class="label">Favorite sport:</label>
    </td>
    <td>
        <select name="personBean.sport" id="save_personBean_sport">
            <option value="football">football</option>
            <option value="baseball">baseball</option>
            <option value="basketball" selected="selected">basketball</option>
        </select>
    </td>
</tr>
Note the table formatting created by the Struts framework when using the Struts select tag. The CSS classes are defined in style sheets included by the Struts s:head tag. The Struts s:head tag is placed inside the edit.jsp’s head section.
Since the personBean’s getSport method returns “baskeball”, the basketball option value is marked as selected.
Struts Radio Tag
The Struts radio tag—like its standard HTML counterpart—is used to display 2 or more choices, only one of which can be selected by the user. Here is the code for the Struts radio button from the example application.
Struts Radio Tag
<s:radio key="personBean.gender" list="genders" />
Again the key attribute’s value determines the value for the label and value attributes. The label’s text is derived from the EditAction.properties file (key personBean.gender). Just like the Struts select tag, the list attribute of the Struts radio tag causes the framework to call the getGenders method of the EditAction class. The Array of String objects returned are used to create the individual radio buttons.
HTML Created By Struts Radio Tag
<tr>
    <td class="tdLabel">
        <label for="save_personBean_gender" class="label">Gender:</label>
    </td>
    <td>
        <input type="radio" name="personBean.gender" id="save_personBean_gendermale" value="male"/>
        <label for="save_personBean_gendermale">male</label>

        <input type="radio" name="personBean.gender" id="save_personBean_genderfemale" value="female"/>
        <label for="save_personBean_genderfemale">female</label>

        <input type="radio" name="personBean.gender" id="save_personBean_gendernot sure" checked="checked" value="not sure"/>
        <label for="save_personBean_gendernot sure">not sure</label>
    </td>
</tr>
Also just like the Struts select tag the result returned by calling the personBean object’s getGender method is used to determine which of the radio buttons is checked.
Struts Select Tag - Object Backed
You may need to create a Struts select tag where the options displayed to the user each have their own value that is different from what is displayed. In the example application, the user’s residency is stored as a two-letter abbreviation (e.g. KS), but the form select box should display the full state name (e.g. Kansas). To create such a select box in Struts, you would use this code
Struts Select Tag Object Backed
<s:select key="personBean.residency" list="states" listKey="stateAbbr" listValue="stateName" />
The list value tells the framework to call the getStates method of the EditAction class. That method returns an ArrayList of State objects. Each State object has getStateAbbr and getStateName methods.
The listKey attribute tells the framework to use the value returned by calling the getStateAbbr method as the value for the value attribute of the HTML option tag and the value returned by calling the getStateName method as the value displayed to the user. So the above Struts select tag code results in this HTML.
HTML Created By Struts Select Tag
<tr>
    <td class="tdLabel">
        <label for="save_personBean_residency" class="label">State resident:</label>
    </td>
    <td>
        <select name="personBean.residency" id="save_personBean_residency">
            <option value="AZ">Arizona</option>
            <option value="CA">California</option>
            <option value="FL">Florida</option>
            <option value="KS" selected="selected">Kansas</option>
            <option value="NY">New York</option>
        </select>
    </td>
</tr>
The value returned by calling the personBean object’s getResidency method determines which of the select tag’s option tags is marked as selected. In our example, since getResidency returns “KS”, the option tag whose value attribute equals “KS” is marked as selected.
Struts Checkbox Tag
The Struts checkbox tag is used to create the HTML input type equals checkbox tag. The value for the key attribute tells the framework what method to call to determine if the checkbox is checked or not checked. The method called should return a Boolean value (true or false). A return value of true will cause the checkbox to be checked and false the checkbox will not be checked.
Struts Checkbox Tag
<s:checkbox key="personBean.over21" />
Since the method isOver21 returns true, the checkbox is checked.
HTML Created By Struts Checkbox Tag
<tr>
    <td valign="top" align="right"></td>
    <td valign="top" align="left">
        <input type="checkbox" name="personBean.over21" value="true" checked="checked" id="save_personBean_over21"/>
        <input type="hidden" id="__checkbox_save_personBean_over21" name="__checkbox_personBean.over21" value="true" />
        <label for="save_personBean_over21" class="checkboxLabel">21 or older</label>
    </td>
</tr>
When the form is submitted and the checkbox is not checked, no value will be posted for the checkbox (this is how HTML forms work). Since the Struts framework will need to update the value of the personBean’s over21 instance field to false—given that the check box was not checked—the framework needs a way to determine if the checkbox was not checked after form submission.
If you examine the HTML code created by the Struts checkbox tag, you’ll see that it created a hidden field associated with the personBean.over21 checkbox. When the Struts framework intercepts the submission of this form it will use this hidden form field to check if the associated checkbox field exists in the posted form data. If that checkbox field doesn’t exist then the Struts framework will know to update the value of the personBean object’s over21 instance variable to false.
Struts checkboxlist Tag
The Struts framework provides a unique form field control that creates a series of associated check boxes, one or more of which can be checked. In the example application, the Person class has an Array of Strings, which is used to store car models owned by a person.
Using the Struts checkbox tag, we can create a series of checkboxes, one for each possible car model the user may own. The value of each String in the personBean’s carModels Array will determine which checkboxes are checked.
Struts Checkboxlist Tag
<s:checkboxlist key="personBean.carModels" list="carModelsAvailable" />
The list attributes value in the checkboxlist tag tells the Struts framework which method to call to get the possible car models. In the example application, the framework will call the EditAction class’s getCarModelsAvailable method. That method returns an Array of Strings. For each element of the Array, the Struts framework creates a checkbox (including the associated hidden field described above).
The key attribute value in the checkboxlist tag tells the Struts framework which method to call on the personBean object to determine which checkboxes should be checked. In the example application, the framework will call the personBean object’s getCarModels method. The getCarModels method returns an Array of Strings. For each String value in that Array that matches a String value in the Array returned by the EditAction class’s getCarModelsAvailable, the checkbox will be checked.
HTML Created By Struts Checkboxlist Tag
<tr>
    <td class="tdLabel">
        <label for="save_personBean_carModels" class="label">Car models owned:</label>
    </td>
    <td>
        <input type="checkbox" name="personBean.carModels" value="Ford" id="personBean.carModels-1" checked="checked"/>
        <label for="personBean.carModels-1" class="checkboxLabel">Ford</label>

        <input type="checkbox" name="personBean.carModels" value="Chrysler" id="personBean.carModels-2"/>
        <label for="personBean.carModels-2" class="checkboxLabel">Chrysler</label>

        <input type="checkbox" name="personBean.carModels" value="Toyota" id="personBean.carModels-3"/>
        <label for="personBean.carModels-3" class="checkboxLabel">Toyota</label>

        <input type="checkbox" name="personBean.carModels" value="Nissan" id="personBean.carModels-4" checked="checked"/>
        <label for="personBean.carModels-4" class="checkboxLabel">Nissan</label>
        <input type="hidden" id="__multiselect_save_personBean_carModels" name="__multiselect_personBean.carModels" value="" />
    </td>
</tr>
Summary
There are several other Struts form controls you should explore. If you need more information about the Struts form tags consult the Struts documentation.
| Return to Debugging Struts | or | onward to Form validation using XML |